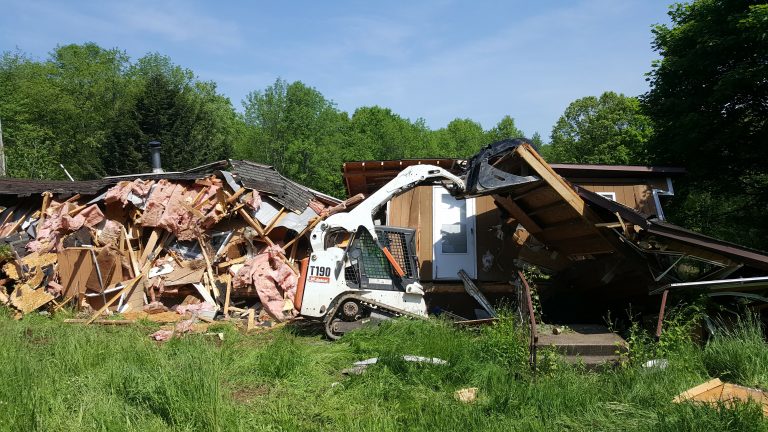
Mobile Home & Trailer Demolition may be simpler than traditional home demo, but like any real demolition project it can be extremely dangerous. A broken down or dilapidated trailer home on your property can be an eyesore. Mobile homes only have a roughly 50 year lifespan, so anything within that range is sure to need removal quickly.
The main tools you’ll see used when mobile homes are
demolished include:
Excavator
Skid Steer
Hand tools
Truck and Chain
Mobile Home
Demolition is not for beginners or DIYers
It is much too risky for an inexperienced mobile homeowner to try to demolish the home themselves. With one wrong cut or mistake things can collapse or become very dangerous very quickly. It is always best to search for a local professional demolition company for mobile home or trailer removal.
Steps of Mobile Home
Demolition
With the right equipment and experience, demolishing and
cleaning up after a mobile home can be done in as little as 5-6 hours! When you
hire a professional to demo your trailer, here’s what you can expect:
Disconnect all utilities before any work is done
Large dumpsters on site for debris removal and
proper dumping
Start with walls- they are the main structure
holding up the home
Remove the roof, and place larger pieces into
one area for further breaking down
Load the dumpsters with debris, separating
recyclables and hazardous materials
Flip the trailer over in order to remove the
bottom frame of the structure
Cut up the trailer frame (in a safe location)
using a sawmill.
Clean up remaining scraps and debris piles and
put into dumpsters
Load up remaining recyclables or separate
materials for their proper waste removal destinations
Don’t forget to obtain
all necessary permits prior to beginning demolition!
Selling Scraps
People demolishing their mobile homes often wonder what the
scrap value of an average 70′ mobile home might be. Unfortunately, after
demolition the average scrap values only $300-400 depending on its specific
materials. The demolition and removal costs for a mobile home or trailer majorly
outweigh any scrap value of the same home. Be extremely cautious of anyone who
offers trailer demo in exchange for scraps, as they typically leave EVERYTHING
else behind for you to clean up!
Call Professional
Demolition Contractors
If you are located in Austin and need a mobile home or trailer removed, our experienced and reputable demo contractors are more than happy to help. We are experienced in demolition, dumping, and hauling, and we know how to safely and quickly remove all debris and acquire all permits. Contact us today to learn more.
The first step to cleaning out any space is to find out everything
that’s actually in it. Move one section at a time and sort items into
predetermined piles in your driveway or another empty space. Once you’re done,
it’ll give you a much better idea of just how much of each ‘category’ of items
you have, which will help you figure out storage and plan a new layout.
“Oftentimes, the
garage floor is cluttered, preventing people from parking or even walking
around. I typically start cleaning a garage at the outside door, moving inward
and concentrating on clearing the floor. We make categories for each piece we
find: garbage, donate or keep. All the items are separated in piles outside the
garage, so we can easily see what’s left inside. We then work on the sides of
the garage, using the same categories as we sort.”
Professional
Organizer, Beth Levin of Closet Queen
2: What Will Your
“Keep” Criteria be?
Once everything is out of the garage, you’ve got to make
rules for deciding what to keep and what to toss or donate. This should help
you from spending too much time on any individual items. Ask yourself: “Is this
here for a particular reason, or was it moved here because it didn’t have a
spot elsewhere?” If it isn’t there for a certain purpose, it’s time to get rid
of it.
General guidelines/ideas for keeping items:
You’ve used it more than once in the past year
Things in working condition that could be sold.
This does NOT include a project you’ve been “working on” for 5 years now and
not gotten around to finishing.
Particular or specialized tools that aren’t easy
to rent or borrow.
“It’s important to keep items that the homeowner needs and
wants while also zoning the garage. Some people are gardeners and need to have
a gardening station with pots, soil, and other paraphernalia. Others are car
aficionados, athletes who play lots of sports, handymen who need a station for
tools. If, on the other hand, we find four items that all do the same thing, I
would encourage the homeowner to donate two or three of them to save space.”
Beth Levin
3: What To Do With
Junk
If it didn’t make the “keep” pile, it’s time for it to go. With the useful items set aside, start to sort through your junk and clutter. Just because it wasn’t in your “keep” pile, doesn’t mean you can’t get one last thing out of it, the first thing you should do is pull out any items you can sell or donate. Anything left over goes straight in the dumpster. Don’t keep too much or you will need to call a Austin demolition company to help with the clean up.
The only options for remaining junk:
Donate It.
Sell It.
Toss It.
4: Deep Cleaning
While you’ve got your garage empty, you’ve got a good
opportunity for scrubbing and cleaning surfaces that are normally hard to get
to. Unless you’re doing a complete demo or remodel, in which case you can go
ahead and leave those cobwebs where they are.
Step 5: Get Organized
You won’t want to do this again any time soon, so try and
get a game plan for keeping it organized moving forward. With your “keep” piles
organized, you should have a good idea exactly how much space you’ll need for
each category of item. Get shelving, drawers, or other methods that keep often
used items close by and rarely used items further back.
Getting rid of any structure, no matter how small, can be dangerous. If you’re removing an old shed or barn completely, that’s demolition work. Permits, safety gear, disposal methods, there are a lot of factors to consider.
The Dangers
First and foremost, is the shed in good condition or is it rotted and crumbling? Is the supporting structure in tact or could it fall at any minute? If it’s not in average condition and you’re a novice at projects like these, now would be the time to put down the hammer and call a professional shed removal contractor. The last thing you want is to be trapped under hundreds of pounds of splintered wood because you hit one wrong beam. Keep children, pets, friends, and anyone who isn’t experienced in Austin demolition out of harm’s way.
Wooden Sheds
Wood is the most common material used for sheds that you’ll
come across. Unless you built it, you’ll need to figure out whether it’s made
of pine, oak, composite, plywood, or another wood. Once you’ve got your bearings,
removing the roof will be the first step of this process. If your structure
isn’t more than one story, you won’t need scaffolding.
Some older wooden sheds are incredibly tough and sturdy, and
have been standing for decades. I mean 2×6 walls with the corners braced and
bolted down to a concrete slab. Even if this isn’t your first home project, a
shed like this is best left to the pros. It needs to be cut and deconstructed
into smaller pieces before demolition can really even start.
Brick/Stone Sheds
Tougher than some of the sturdiest wooden sheds, if you have
a brick, concrete, or formed cement building to knock down you’ve got a lot of
work ahead of you. This will take substantially more time and physical power
than any wooden shed. You need much more heavy duty tools to start breaking
something like this down, and calling a professional can save you time,
injuries, and money.
If you are going to take it on, make sure your dumpster rental can handle heavy masonry or concrete and there won’t be any additional fees. Many companies separate construction and residential dumpsters and have different content and capacity regulations. Make sure to get all the information beforehand and don’t get loaded up with surprise fees and add ons later. You’ll also need proper safety gear like hard hats, goggles, gloves- not to mention the actual gear. Unless you have a jackhammer and backhoe laying around your yard, renting and learning to operate one can be extremely time consuming and expensive. Demolition is much more dangerous and difficult than many people think, so make sure to do all your research and know when to call the pros.
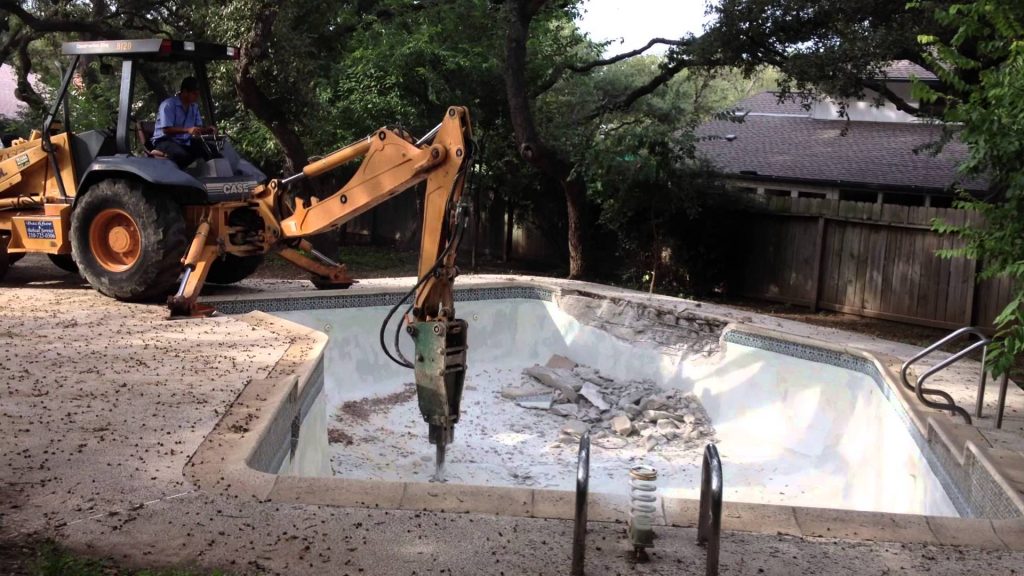
Which Type of Swimming Pool Removal is Best for You
What may have started as a great idea for your home can quickly turn into a money pit for many. Once you decide it’s time to get rid of your pool, it’s not a simple or quick task. A lot of pool demolition will depend on your city’s regulations- some cities allow you to partially collapse and fill the pool, while other require you to completely remove all concrete and backfill the area with a licensed engineer.
Partial Removal +
Non-Engineered Fill
This is often the most common removal type for pools. The
process involves creating holes in the bottom of the pool, breaking the sides
down 18″-36″ and then filling/compacting the space with no required
engineer supervision.
Advantages: Most people who are focused
on pricing will go for this option for its low cost and the fact it can be done
in just 4 or 5 days.
Disadvantages: While it may look average
once filled in, if you sell your home you will be required to disclose to any future
buyers of this, which can devalue it since it makes that area unbuildable.
Partial Removal +
Engineered Fill
This will be the same process, but an engineer technician
would do density testing before filling and also submit a letter to the city. Typically
this is only necessary if required by the city.
Advantages: This has the same advantages
in cost and speed, but the added bonus that you have engineer verifications
that it’s done properly.
Disadvantages: Though verified, you will
still have to disclose to future buyers the partial removal.
Full Removal +
Non-Engineered Fill
All concrete, fiberglass, tile, liner, re-bar, and other
materials are removed from your in ground pool and disposed off properly, then
the cavity is filled in.
Advantages: If selling your home, the
full removal means none of the property is un-buildable and keeps the value
high. Additionally, without concrete or debris left over, the backfill is much
more likely to be even and completed correctly.
Disadvantages: If anything goes wrong
with the fill, you have no verification that it was done properly. If you are
going to go through the expense to fully remove the swimming pool anyways,
spend the extra money and have it properly engineered to cover all your bases.
Full Removal +
Engineered Fill
As above, all materials are removed and hauled offsite, and
the area is filled and compacted. With an engineer, you’ll also get your demolition
plan stamped by a state licensed engineer, they will perform density testing
and supervise any filling, and submit a final review stating the area is
“buildable” after removal.
Advantages: This is the absolute best
process as it covers all bases and ensures your property value.
Disadvantage: The only downside is that
it’s the most expensive option.
This is a rough overview for inground pool removal, but there are local and situational differences in each demolition. Make sure you consult in depth with a swimming pool demolition contractor about your home and what the right process is before starting and project.
Depending on the size of your kitchen and just how much needs to be changed, a true kitchen remodel can take anywhere from a few weeks to over a year. Mixed with contractors, kitchen demolition, design, appliances, and other factors, it can be extremely unpredictable. For a major renovation that alters the structure and blueprint of the overall space, a realistic timeline is about 6 to 12 months. That time includes the process of planning and designing, hiring a contractor, choosing furniture and materials, demolition, and the new kitchen build out.
Planning Your Remodel
Begin by fully picturing the end goal of your new kitchen. Use
Pinterest or make a mood board of photos and designs you like. Make sure you
know exactly what it is you’re looking for. Figure out what will be replaced,
what hardware and finishes are ideal, what appliances will stay and go. Make
sure you lay out ahead of time what is a “must-have” and what is “nice-to-have”
for your redesign so that you aren’t going over budget left and right. The
larger the scope of your project is, the more important having a well thought
out plan and budget are.
Create a budget. If you’re going by industry standards, the
typical rule is to set aside 10-25% of your home’s total value for the project.
Whatever number you choose, the most important thing is actually sticking to
your budget and following it no matter what. Including an extra 10-15% cushion
for any issues or problems is a good way to make sure you don’t have unexpected
drawbacks or changes in your plan.
Hire a contractor. Unless you have wholesale retailers in all sorts of materials and a good knowledge of construction, hiring a professional demolition contractor is the way to go. They should be experienced, trustworthy, and good with their day to day communication. The best contractors are usually found through referrals from friends or neighbors who have had their home remodeled, and already done a lot of the vetting- not to mention already worked with them. Don’t forget that good contractors tend to get booked out pretty far in advance, so contact them as soon as you know your timeline.
Consult with a designer. After you’ve got your vision, and
measured you space out, it’s helpful to consult with an interior designer. Even
if all you have is general photos of what you like, their job is to translate these
concepts into one well-designed area. Be clear about your needs,
‘nice-to-haves’ and your budget. Initial design Takes a couple of days, and the
final design can be completed in a few weeks depending on how involved and
prepared you are.
Get quotes.
Once you know the aesthetic you’re going for and have the
contractor on deck, get all your quotes for different finishes, materials,
fabrics, anything you need and compare it to your budget. The better you
communicate your budget with designers and contractors, the more on budget
you’ll stay and the less surprises you’ll have later on.
Rough Construction
Here is where the kitchen demolition and rebuilding come in.
You’ll have the main structures here with pipes, electrical wiring, and you’ll
see the basic floorplan of your new kitchen manifest.
Demolition and removal of your kitchen takes anywhere from several days to 3 weeks. It all depends on how much is being removed, what is staying, what needs final inspection, special installation, etc.
Utilities will take 1 to 2 weeks on average. Once debris is cleared, the contractors begin rough outlines and beginning electrical and plumbing jobs (like if you’re moving a sink, refrigerator, stovetop, or adding in some gas/electrical fixtures, including lighting ad outlets in your new kitchen).
It will take 2 to 3 days to install and finish drywall. If you aren’t adding walls then move right on to the flooring!
New floors can take 3-5 days to get installed. Different types of floors are installed at different points in the build, wooden floors will often go first before anything else whereas vinyl flooring can be added and cut after cabinets are installed.
Final Construction
This will take 1 to 2 months on average because there is
much more detail involved. The rough construction was all framework, but this
construction includes all of your aesthetic details as well. Your new cabinets,
countertops, tile, lighting, and appliances are all put into place and you’ll
finally see your new kitchen.
Cabinet installation typically lasts 3-5 days.
Details come into play here because you must make sure cabinets are level and
balanced in relation to your floor/walls.
Adding in countertops can take anywhere from 1
to 4 weeks. Your new counters can’t be added until all of your base cabinets
are in place and properly mounted. THEN you can measure and install
countertops.
Lighting will take only 1 or 2 days. New switch
boxes and wiring lights can start off time consuming, but if properly prepared
it will be simple.
Depending on material, backsplashes tend to take
1-2 days as well. Usually it can be done one afternoon, but if you’ve got an
intricate design with small tiles or uneven areas to cover it can take a litte
more time.
Appliance installation is usually done in one
day. Once you know electrical, HVAC and gas are all set up properly, it’s just
a matter of unpacking and plugging things in.
Cleaning up
Construction Debris
Hire a junk removal crew or rent a dumpster to make this quick an easy. Check ducts, vents, cabinets, anywhere where dust could have built up or extra tiles and debris may gather. Save sweeping and wiping down for last. With all of that done, the only step left is moving back in! Organize your pots, pans, spices, final décor, and your new kitchen is complete.
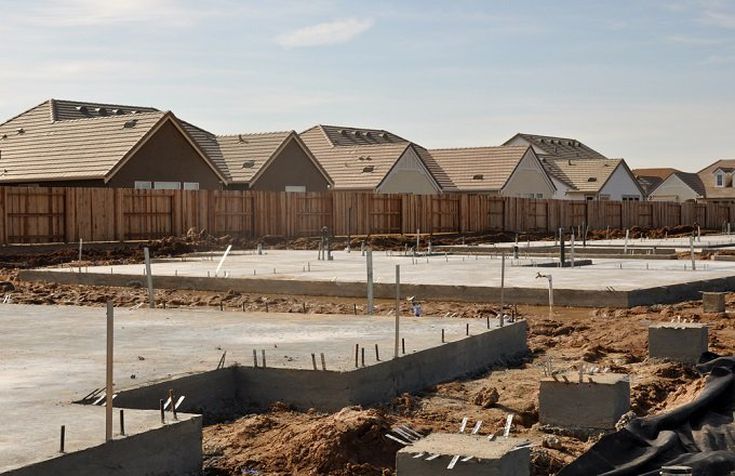
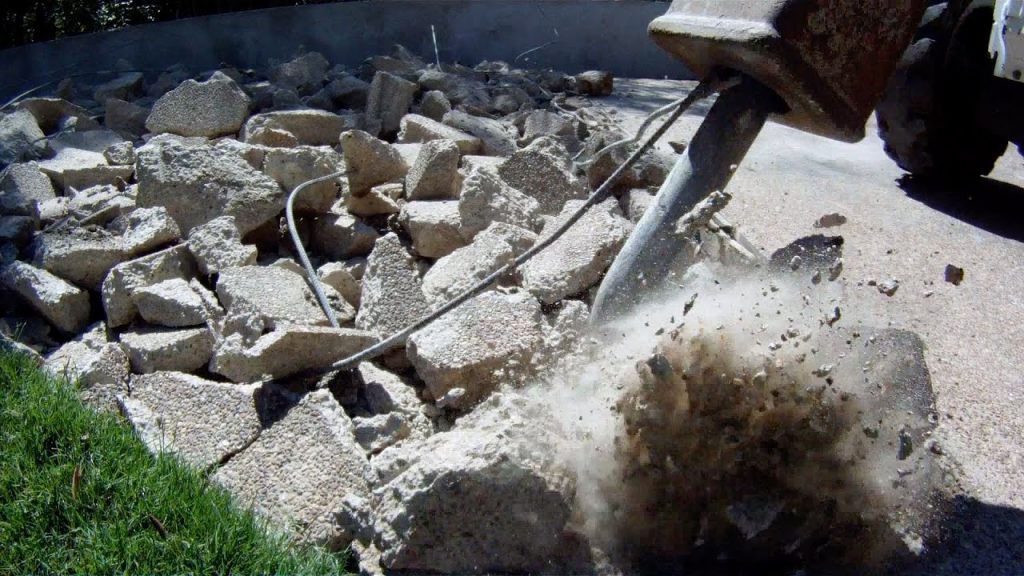
A solid foundation is integral to durability and longevity in your home, and concrete is the most typically used for sturdy construction. Various types of these exist for many different purposes. Whether you’re building a home from scratch or demolishing an existing concrete foundation to repair it, you must consider soil type and slab types before building. You should also consider the style of home you’re building, and check any city or local regulations.
Types of Concrete
Foundation:
T-Shaped
If you’re living somewhere where the ground is prone to
freezing, the T-shape foundation is going to be the standard. The main concrete
is placed below any frost line in the ground, and walls are built up from it.
Slab-on-Grade
What you typically think of, this is a single, thick concrete
slab- but poured on crushed gravel or substrate for better drainage. This
foundation is usually poured thicker at the edges in initial installation for
better footing. This is best suited for locations where the ground does not
freeze, or is unlikely to freeze.
Both the T-shaped and slab-on-grade make great and
long-lasting concrete foundations. It comes down to location and cost for most
final choices.
Frost-Protected
A third type is the frost-protected concrete foundation-
which really only is suitable for heated structures. It uses two sheets of
insulation, one on the outer wall and one at the base. Then it’s all laid out
on some substrate like gravel. The layers of insulation prevent freezing and
help structures above ground stay in tact.
If you need any type of concrete slab or foundation removed, it can be a very dangerous and time consuming process. Contact a professional demolition contractor and have the concrete removed quickly by an experienced member of our team.
Renovating an old, rotting deck much easier than starting from scratch and completely replacing it. Not to mention, saves you money in the end. Just grab a few friends or family members to help and you can replace the shabby space in your backyard with something new in a few days. No deck comes in the same materials, shape, or finish- so this is a general guideline of useful renovation tips.
Inspection
The first step is always inspection- no matter what type of home
project you’re doing. Figure out what needs replacing or what can stay. Make
sure to cover the supporting structure, the floorboards, railings, anything
there that could need fixing. The railings and lattice are where most damage
and warping can occur. If those are the only problem areas you find, it will be
a whole lot cheaper than replacing the whole deck.
If the frame and main boards are structurally sound with
just cosmetic damage, try a good power wash to remove old finishing and
re-stain it. This can help fix the aesthetic without actually removing any
parts!
Building Permits
Home deck renovation won’t always require permits, but hiring
a professional or consulting with a contractor is always a safer alternative
than going off on your own. Make sure your homeowner’s association doesn’t have
any regulations or restrictions as well.
Demolition
Need to fully remove a wood deck, railing, or other materials? There are 2 ways:
A small dumpster rental can work for replacing railings and
lattice on an average sized deck. It’s always best to check with your local
dumpster rental company to see what size they recommend, and what weight or
debris restrictions they may have BEFORE filling it up. For small decks, hiring
a junk removal service may be cheaper. If you aren’t exactly sure what you’re
doing and don’t want to risk the injury, a professional demolition contractor
will come by and assess the situation, give you a quote, and do the removal and
hauling themselves. It’s a much quicker and easier option that gives you more
time to focus on finding the new materials and finishes for your deck.
Cleaning and/or
Pressure Washing the Deck
For whatever the crew doesn’t throw in the dumpster, mix
some deck cleaning solution with water and thoroughly clean remaining wood. Pressure
washing the wood will help get rid of residual finishes and stains, as well as
mold and cosmetic damages. Make sure you let the cleaned wood fully dry before
starting to work on it again!
Choose Your Materials
Premium treated wood or composite materials will make the
best looking and longest lasting decks. Treated wood lasts for decades on
average with regular care, and composite decking can last even longer. Even if
price is a concern, remember how involved it is renovating your deck. You
probably won’t want to do this any time soon again.
Finishes
Last but not least, you’ll need to pick either stain or
paint for finishing your deck. If choosing paint, make sure you’re giving a
clear protective coat over the dried paint to help it last longer. Lighter
paints and stains will be best if you have full sun on your deck. Darker colors
can get very hot to the touch and fade more quickly.
Chain link fences are a strong, durable, and affordable option for fencing your home. For just a small price you get a secure perimeter around your home without worrying about having to remove old rotting wood fences or ongoing maintenance like other materials.
Many people dislike how chain link fences may come off aesthetically however and choose to have the chain link fence removed. But there are many different options when it comes to chain link fencing you can get, and not all have such a harsh look to them. Here are some of the common types homeowners go with.
1. Polymer Coated
& PVC
PVC and polymer coated chain link fences have grown in
popularity in recent years. They are typically much more aesthetically pleasing
especially for homes and neighborhood fences than standard steel, but will come
at a slightly higher price point. When choosing between the two it’s important
to note differences: polymer is a powder coat applied to the steel, while PVC
is a vinyl. When finished, both of these options provide a rubberized coat
across the metal which protects it from harsh weather and looks a lot nicer.
2. Colorful Finishes
The PVC coatings can be found and made in a variety of
different colors, making PVC much more popular as an option. Green PVC coating is
one of the more common color coatings for gardens and landscapes, since it
blends in with plants and provides a more muted appearance. The brown and green
earth tones are most widely used to blend into natural environments, and black
is often used to make a clean and modern appearance.
3. Standard Galvanized
Steel
The most common chain link fence style sold and seen around
town is galvanized steel fencing. Since chain link fences are made completely
of metal, rust is a natural concern. By galvanizing the fencing, it creates a
more durable product and protects against rust and corrosion. Zinc is most
often used in the process of galvanizing the fence, but quick research will
show you other options can be used as well.
4. Slatted Fences
Your standard woven chain link fences don’t
create a whole lot of privacy. Slatted chain link fences can quickly fix this
problem if you’re still durable metal fencing. These simply add long pieces of
metal, or “slats”, in the metal gaps, giving you extra privacy and covering up
any large areas. Slats are made from versatile materials like PVC that can be
made into many different colors and finishes to create something truly unique
and aesthetically pleasing.
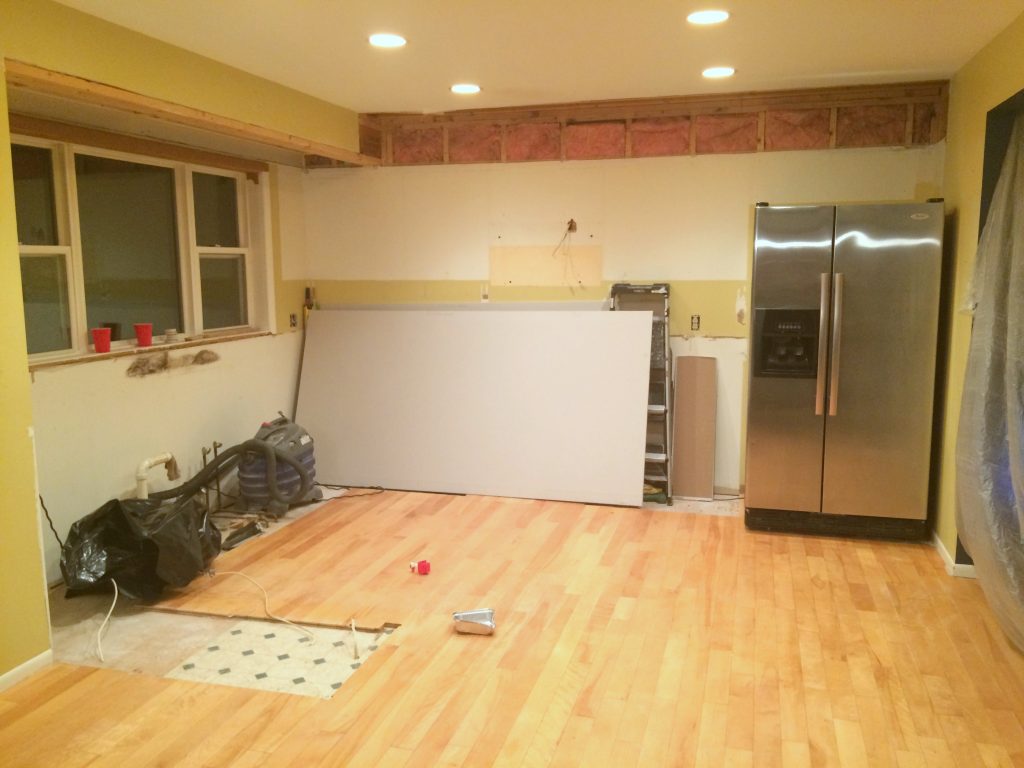
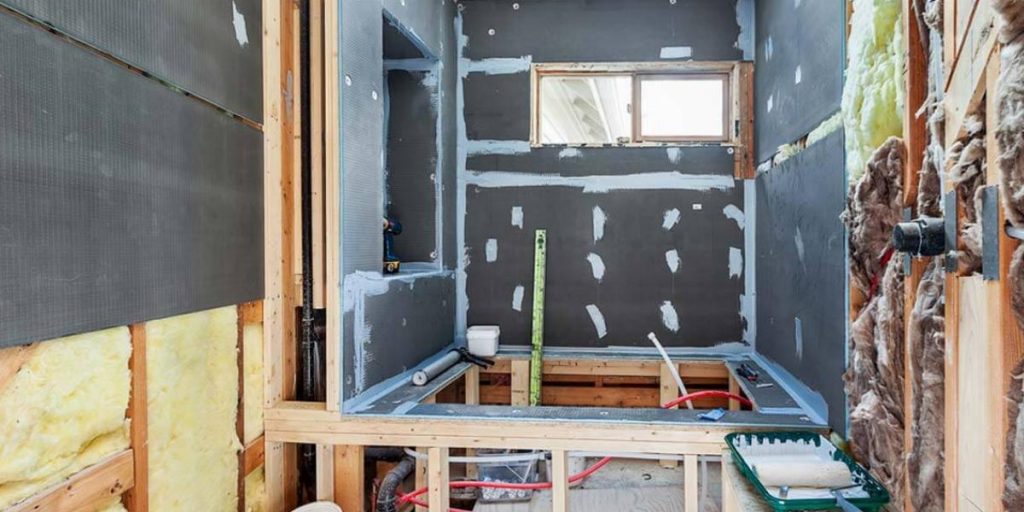
Unless you’ve got a brand new home, when you’re starting a bathroom demolition it’s worth considering to completely gut it and start from scratch. Starting with complete demolition, I decided to begin remodeling my bathroom a month ago. If I had not decided on a total demo there are handful of issues I would have never found, much less have been able to repair. From my journey, here are my recommendations after opening up the walls and ceiling of my home built in the 70’s.
1. Repair any termite
damage and eradicate pests
Upon first opening the walls, I found quite a bit of termite
damage to major wall studs. Fortunately for me, the damage wasn’t recent- but I
had an exterminator come and spray just in case. Even if your home was covered
at one point with pest control, it may not have always been that way and can
have old damage like mine did. Do your due diligence.
2. Remove and replace any rotten floorboards and sub-flooring
After finding the termite damage behind the walls, I also spotted some warped and rotten sub-flooring below and next to the bathtub. Some of the tiles had shifted and started popping up in that area, and I believe it’s from poor ventilation and the floor getting too wet.
3. Make sure you
actually have correct insulation
We had to have SOME insulation, but I was surprised to find it was a different kind that I expected. When our neighbor’s ice maker quit working a while back and had a horrible leak, it took out part of our shared laundry room wall which had R-11 fiberglass for insulation. We assumed this was the case for the rest of the home but were unpleasantly surprised to find different types of insulation across the house, and it explained why our bathroom retained heat so poorly.
4. Locate and close
off any air leaks
Any home built decades ago will have a few leaks. I was
aware of several major holes from just rummaging through the basement, but I
wasn’t sure just how many there were. The walls were covered with Celotex, a
fiberglass almost guaranteed to leak. But if you can be optimistic, at least
that means one more improvement for the new bathroom! It’s best to test before
and after for leakage, to make sure you’ve gotten all of it covered.
5. Ducts and fans in
the bathroom
You may think if your bathroom has a window you can just air
it out naturally, and you don’t need any additional fan. You’d be very, very
wrong. Window or not, I’ve taken readings on temp/humidity without a fan in my
bathroom and it’s not enough. Even if you DO have a fan in your bathroom
currently, it’s likely not moving enough air through to keep water damage at
bay. A standard bath fan only circulates roughly half of its rated airflow.
6. Get all plumbing
issues out of the way
I’m not a certified plumber, but when I opened up my wall I
knew something was off. We had pipes connected in ways that could never be
accessed (even by a professional) without removing the wall, and valves that
weren’t all the way open. We had someone come take a look and unsurprisingly
found a few more basic plumbing mistakes that we were happy to have fixed.
I hope some of this helps you decide to do a complete bathroom demolition and gut your bathroom if you’re planning a remodel. There are tons of issues you can fix all at once, not to mention you may find things you didn’t even realize needed repairing. Make sure to hire a professional for any home demolition, and contractors that have the correct permits and know-how to get it done right.
The most common question we get for concrete removal is, “Should I remove my old driveway first, or just lay new asphalt over my current concrete driveway?”
It’s a great question to ask, residential OR commercial. In
general, we tend to side with asphalt before concrete as a better choice in the
long run. But if you’re in the process of getting an asphalt driveway and
there’s already concrete there, it’s a totally different ballgame.
Not the Best Idea
If you’re literally asking only if you “CAN“ lay asphalt on
top of concrete, then technically yes. It’s not impossible, and if that’s the
only thing you really want, go for it. Many people go with this simply because
it’s cheaper (up front) than getting the concrete demo and removing it all.
However, there are a lot of reasons we don’t recommend this.
Breaking up and removing existing concrete is important in order to:
Lay the ‘right’ base
for your driveway
The main issue that comes up when covering concrete with
asphalt is all about prepping the site properly. With concrete, to make a more
stable slab you just lay the base on thicker. Unfortunately, this also means
that contractors putting down concrete don’t often prepare the base. The ground
underneath the driveway could be any material, like loose soil apt to shifting
or sinking, and until it’s dug up you won’t know what you’re dealing with.
Make your driveway
last longer
When you pour your asphalt over existing concrete driveways and it DOES rest on an unstable base, any asphalt that you’ve poured is much more likely to be unstable. Initial joints in the concrete driveway can create cracks in the asphalt, a very expensive repair. In the most extreme example, any movement or ground shifting could create a crack across the entire surface, like how a home foundation cracks from improper laying of the base. Asphalt driveways will last longer and stay looking great if you take the time to fully remove old concrete and properly lay the base. Reach out to Austin Demolition Services today to get some help removing an existing concrete driveway